Passwordless sudo and verified GitHub commit signing with YubiKey
If you are like me - you can't type your complex password correctly when your entire team is staring at you on a pair coding call.
When you are done reading this post, you will never need to again. Instead, you will tap your Yubikey to execute a sudo command without ever touching a password prompt.
Next, I will show you how to automatically sign your GitHub commits with the private PGP key that only exists physically on my Yubikey 5 NFC and which cannot be exported from the device. This means you cannot author a verified commit on GitHub as me unless you are in the room with me - like right now - and have admin access to one of my machines.
With these two security and workflow enhancements in place, developing software is much faster and less stressful, even if you are doing it under withering glare of curious and malicious.
Not bad for one little device! Along the way, my hope is that you will discover something or other about the Yubikey you did not know before.
This guide will focus on the Yubikey 5 NFC model, and contemplates setting everything up.
Replacing your sudo password with a Yubikey tap
Please read all steps before proceeding. It is very important to NOT CLOSE your PAM configuration editor buffer until you have confirmed that
sudoworks as expected in a different terminal. Failure to follow this advice could lead to pain.
Step 1: Install dependencies
brew install pam-u2fStep 2: Create a Yubico config directory
mkdir -p ~/.config/yubicoStep 3: Plug in your Yubikey
You should see the light flash
Step 4: Add your Yubikey to the list of accepted Yubikeys
pamu2fcfg > ~/.config/yubico/u2f_keysEnter your pin if one is set for the key, then touch the key when the key's light blinks.
Step 5. Configure PAM
# Open your PAM configuration for editing - but DO NOT CLOSE this file
# until you've successfully confirmed everything is working properly
# in a new terminal window!

sudo vim /etc/pam.d/sudo
Find the section of the file that says @include common-auth and add the following line above it:
auth sufficient pam_u2f.soStep 6: Verify
Now - DO NOT CLOSE your original PAM editing buffer, but instead open a new terminal window and type:
sudo echo "SUCCESS"and hit enter. When you do, you should see your terminal "hang" and your connected Yubikey's light start to blink. This means PAM is waiting on you to tap your Yubikey! Do so and you should see:
"SUCCESS"printed in your new terminal. If you do, you are all set and can now enjoy passwordless sudo.
The reason this setup works is thanks to Linux and macOS's Pluggable Authentication Module system. PAM does not do authentication, it allows you to add things that can - such as your YubiKey!
PAM, it is Pluggable Authentication Module ;)
Understanding how Github commit signing
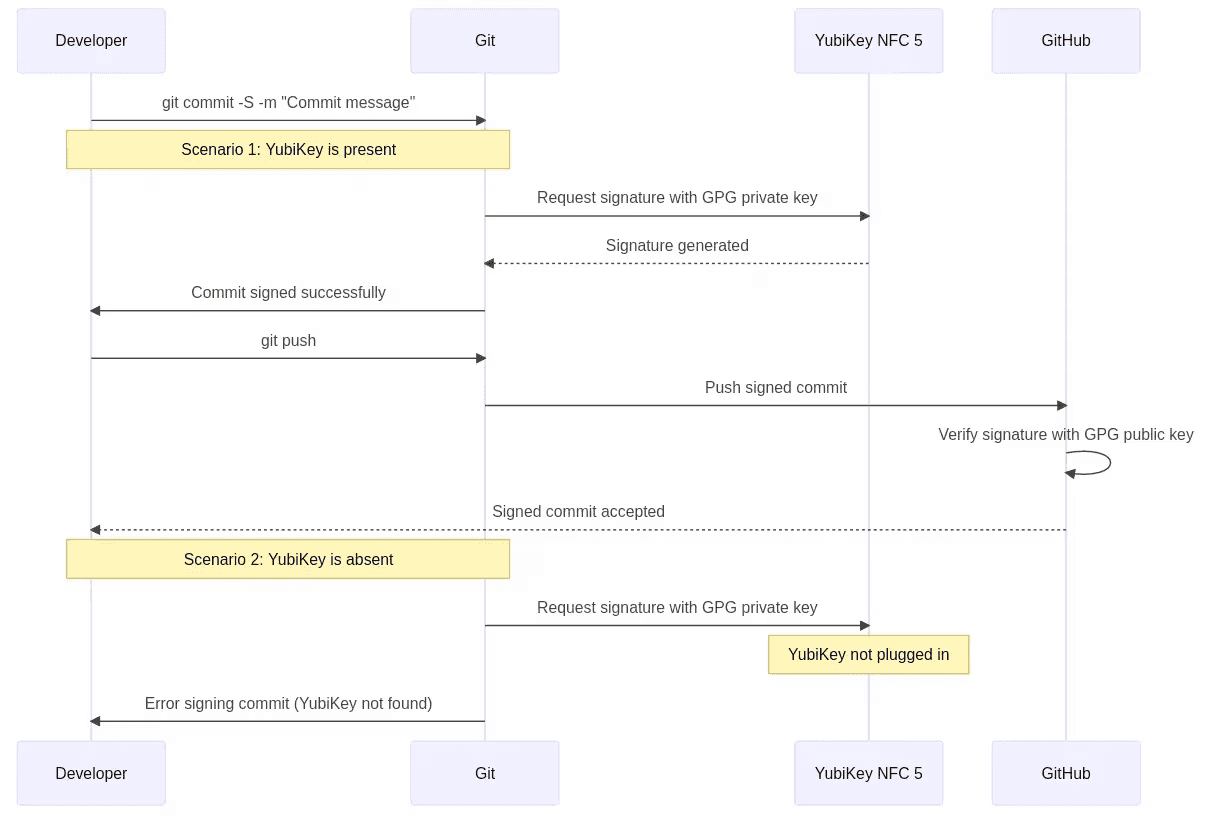
Next up, we are going to ensure that nobody can author a verified commit as you on Github. Here is what that entails in nutshell:
- We generate a new GPG keypair on your Yubikey itself. The private key resides on the Yubikey and cannot be exported.
- We tell our local git installation to use this private Yubikey-jailed key to sign our git commits automatically
- We export and provide the public key to GitHub.
- When we push up signed commits, GitHub automatically verifies them (if signature matches that of our GPG pair) and adds t he verified badge to our commits.
If Yubikey is not plugged into my machine, git signing fails.
This is really powerful, and having used it now, I love it and can't return to my previous ways.
Let's look at a sequence diagram to understand how this flow works:
Commit signing verification is an important step to take if you participate in open source development because it is trivially easy to spoof someone's git commits, without this extra layer of verification protection in place
How to configure automatic github commit signing verification with YubiKey
Step 1: Install Dependencies
Step 2: Generate the keypair on your Yubikey
Follow Yubico's official guide and scroll down to the find the second option:
"Generating your PGP key directly on Your YubiKey"
Step 3: Tell your local git to use the Yubikey-contained private key for commit signing
git config --local user.signingkey AABBCCDDStep 4: Give GitHub your public key
You can follow GitHub's official guide
Once you have completed these steps, author any commit on a local project and push it up to GitHub. You will originally be prompted for your Yubikey's pin, but once you enter that - you won't need to do it again for the length of your session.
Insight: the developer experience is paramount
I needed a solution that was both highly secure and also extremely low friction to my daily workflow. Something that I would actually enjoy using because it is so seamless and reliable.
What makes this setup so ideal is that it does not introduce additional overhead, complexity or maintenance headaches for the developer implementing it - instead, it actually simplifies and eases common tasks. It takes away tedious things you normally have to do while still making you more secure. See also: "frictionless security" . This is the way.